Why Build a Custom Subscription Widget
Third-party subscription apps like Recharge, Loop, and Skio all provide default widgets for product pages, but they share a common problem: they're generic. The out-of-the-box Shopify subscription widget rarely matches your theme's design language, often injects CSS that conflicts with your product page layout, and provides no merchant-configurable options beyond basic label text. For stores selling multi-packs or bundles, there's no way to show per-unit pricing breakdowns that help customers understand the actual value.
Building a custom widget using Web Components solves these problems. The widget is fully encapsulated in a custom element, works in any Shopify theme without a framework dependency, and gives merchants granular control over labels, default options, frequency display, and dynamic pricing, all through the theme editor. The result is a subscription experience that feels native to the storefront rather than bolted on.
How Shopify Selling Plans Work
Before writing any code, you need to understand the Selling Plans API data model. Every subscription in Shopify flows through three nested objects: selling_plan_groups, selling_plans, and selling_plan_allocations. A selling plan group is a container, think "Subscribe & Save" as a group. Inside that group, individual selling plans define specific frequencies like "Deliver every 2 weeks" or "Deliver every month." Each plan carries pricing policies that determine how the subscription price differs from the one-time price.
Shopify supports three pricing adjustment types: fixed_amount (take $5 off), percentage (take 15% off), and fixed_price (always $9.99). These adjustments are enforced at checkout, not by your theme code, which means the discount is guaranteed and auditable. You can't accidentally apply the wrong subscription price because Shopify's backend handles the calculation based on the selling plan's policy.
On the variant level, selling_plan_allocations provide pre-calculated prices for each selling plan applied to that variant. This is the data your widget reads: the allocation tells you "this variant at this selling plan costs $X." When a customer adds to cart, the selling_plan ID gets attached to the line item, and Shopify's checkout knows exactly which pricing and delivery terms to apply. This model works identically whether your subscription backend is Recharge, Loop, Skio, or Shopify's native subscriptions.
The Widget Architecture
The widget is built as a Web Component using customElements.define. This is a deliberate architectural choice. Web Components are browser-native, require no build tools or framework, and encapsulate behavior so the widget can't leak into or be affected by other JavaScript on the page. The custom element <subscription-widget> reads data attributes for the current variant ID, product ID, and default selling plan ID, then manages the product form's hidden selling_plan input behind the scenes.
The separation of concerns is clean: Liquid handles data retrieval and initial rendering, JavaScript handles interactivity, and CSS handles presentation. The Liquid template reads selling plans from the product object, calculates prices and save percentages, and renders the HTML structure. The JavaScript class listens for user interactions, toggling between subscription and one-time, changing delivery frequency, and updates the form accordingly. No AJAX calls, no external API dependencies, no framework boilerplate.
Section Block Settings
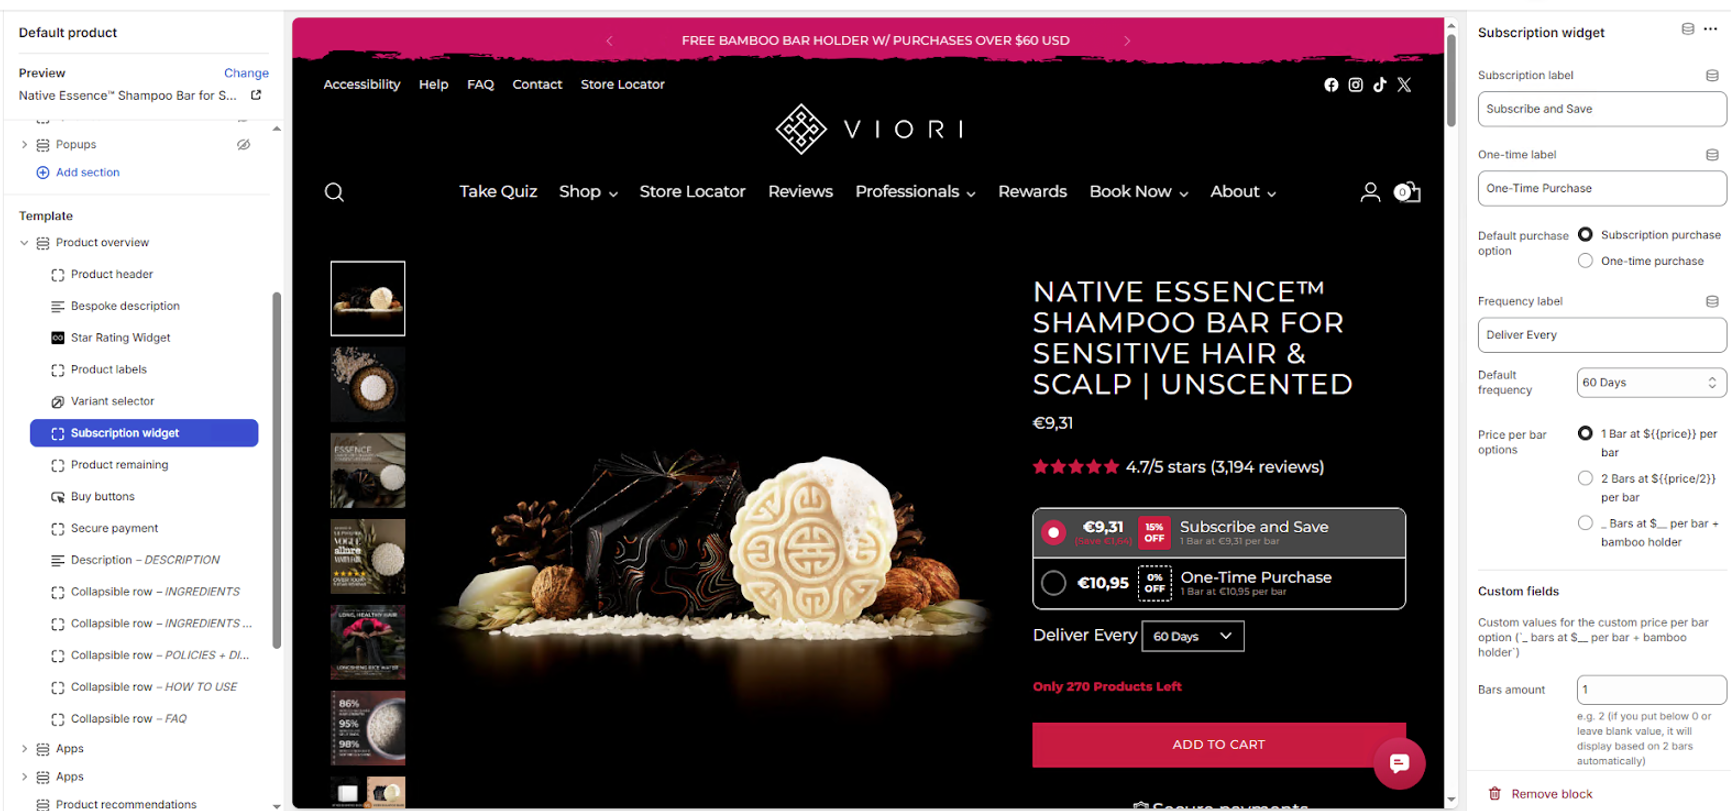
The widget is registered as a section block so merchants can configure it entirely from the theme editor. Every customer-facing string and behavioral toggle is a setting. The subscription label and one-time label control the text on each purchase option card. The default purchase option determines which card is pre-selected on page load, subscription-first for stores optimizing for recurring revenue, one-time-first for stores where subscriptions are secondary.
The frequency delivery label sets the text above the dropdown ("Deliver every"), and the default selling plan matches against the selling plan's option value to pre-select a specific frequency. The price per bar setting enables per-unit pricing breakdowns for multi-pack products, showing "2 Bars at $5.50 per bar" instead of just "$11.00." The enable dynamic price toggle controls whether selecting a purchase type updates the main product price display on the page.
Here's the block schema that powers these settings:
{
  "type": "subscription_widget",
  "name": "Subscription Widget",
  "settings": [
    {
      "type": "text",
      "id": "subsav_label",
      "label": "Subscription option label",
      "default": "Subscribe & Save"
    },
    {
      "type": "text",
      "id": "onetime_label",
      "label": "One-time option label",
      "default": "One-time Purchase"
    },
    {
      "type": "select",
      "id": "default_purchase_option",
      "label": "Default purchase option",
      "options": [
        { "value": "subsav", "label": "Subscribe & Save" },
        { "value": "onetime", "label": "One-time Purchase" }
      ],
      "default": "subsav"
    },
    {
      "type": "text",
      "id": "frequency_delivery_label",
      "label": "Frequency delivery label",
      "default": "Deliver every"
    },
    {
      "type": "text",
      "id": "default_selling_plan",
      "label": "Default selling plan option value",
      "info": "Match the selling plan option value (e.g. 'Delivered every 2 Weeks')"
    },
    {
      "type": "select",
      "id": "price_per_bar",
      "label": "Price per bar display",
      "options": [
        { "value": "none", "label": "None" },
        { "value": "1", "label": "1 Bar" },
        { "value": "2", "label": "2 Bars" },
        { "value": "custom", "label": "Custom" }
      ],
      "default": "none"
    },
    {
      "type": "checkbox",
      "id": "enable_dynamic_price",
      "label": "Enable dynamic price update",
      "default": true
    }
  ]
}
The Liquid Template
The Liquid template is where the data pipeline lives. It reads selling plans from the product object, calculates pricing differentials, and renders the custom element with all the data the JavaScript needs.
{% comment %}
    Subscription widget for Recharge and Subscription app custom widget
{% endcomment %}

{%-liquid

    # variables from block_settings
    assign subscription_option_label            = block_settings.subsav_label
    assign onetime_option_label                 = block_settings.onetime_label
    assign default_purchase_option              = block_settings.default_purchase_option
    assign frequency_delivery_label             = block_settings.frequency_delivery_label
    assign price_per_bar                        = block_settings.price_per_bar
    assign default_selling_plan_option_value    = block_settings.default_selling_plan
    assign enable_dynamic_price                 = block_settings.enable_dynamic_price

    # selling plans and prices
    assign selling_plans        = product.selling_plan_groups.first.selling_plans
    assign onetime_price        = current_variant.price | times: 1.00
    assign compare_at_price     = current_variant.price | times: 1.00
    assign subscription_price   = current_variant.selling_plan_allocations.first.price | times: 1.00

    # if compare_at_price exists
    if current_variant.compare_at_price > 0
        assign compare_at_price = current_variant.compare_at_price | times: 1.00
    endif

    # onetime saved costs
    assign onetime_saved_costs      = compare_at_price | minus: onetime_price | times: 1.00
    assign onetime_saved_percents   = onetime_saved_costs | divided_by: compare_at_price

    # subscription saved costs
    assign subscription_saved_costs     = compare_at_price | minus: subscription_price | times: 1.00
    assign subscription_saved_percents  = subscription_saved_costs | divided_by: compare_at_price

    # default selling plan
    assign default_selling_plan = selling_plans.first
    for selling_plan in selling_plans
        if selling_plan.options.first.value == default_selling_plan_option_value
            assign default_selling_plan = selling_plan
        endif
    endfor

-%}

<subscription-widget
    data-current_variant_id="{{ current_variant.id }}"
    data-current_product_id="{{ product.id }}"
    data-current_selling_plan_id="{{ default_selling_plan.id }}"
    data-enable-dynamic-price="{{ enable_dynamic_price }}"
    class="purchase-option-box"
>
    <div class="options__container default--{{ default_purchase_option }}">
        <div class="purchase-option subscription {% if default_purchase_option == 'subsav' %} selected {% endif %}" data-purchase_type="subscription">
            <div class="purchase-price-box">
                <span class="purchase-price">{{ subscription_price | money }}</span>
                {% if subscription_saved_costs > 0 %}
                    <span class="purchase-saved-costs">(Save {{ subscription_saved_costs | money }})</span>
                {% endif %}
            </div>
            <div class="saved-percents {% if subscription_saved_percents == 0 %} zero-saved {% endif %}">
                <span>{{ subscription_saved_percents | times: 100 | round }}%</span>
                <span>OFF</span>
            </div>
            <div class="purchase-label-box">
                <span class="purchase-label">{{ subscription_option_label }}</span>
            </div>
        </div>
        <div class="purchase-option onetime {% if default_purchase_option == 'onetime' %} selected {% endif %}" data-purchase_type="onetime">
            <div class="purchase-price-box">
                <span class="purchase-price">{{ onetime_price | money }}</span>
                {% if onetime_saved_costs > 0 %}
                    <span class="purchase-saved-costs">(Save {{ onetime_saved_costs | money }})</span>
                {% endif %}
            </div>
            <div class="saved-percents {% if onetime_saved_percents == 0 %} zero-saved {% endif %}">
                <span>{{ onetime_saved_percents | times: 100 | round }}%</span>
                <span>OFF</span>
            </div>
            <div class="purchase-label-box">
                <span class="purchase-label">{{ onetime_option_label }}</span>
            </div>
        </div>
    </div>

    <div class="delivery-option-box">
        <span class="delivery-label">{{ frequency_delivery_label }}</span>
        <select class="delivery__options" name="selling_plan">
            {% for selling_plan in selling_plans %}
                <option value="{{ selling_plan.id }}" {% if selling_plan.id == default_selling_plan.id %} selected {% endif %}>{{ selling_plan.name }}</option>
            {% endfor %}
        </select>
    </div>
</subscription-widget>
The template starts by pulling settings from the section block and querying the product's first selling plan group. Price calculations happen entirely in Liquid, one-time price versus subscription price, save amounts, and save percentages, using compare_at_price as the baseline when it exists. This means the save badge works correctly even when the product is already on sale.
The default selling plan selection logic is worth noting. Rather than always defaulting to the first selling plan, it loops through all plans and matches against the merchant's configured default_selling_plan value. This gives merchants control over which frequency customers see first, a subtle UX lever that can significantly impact subscription opt-in rates.
The rendered HTML is a <subscription-widget> custom element with data attributes that the JavaScript reads during initialization. The two purchase option cards, subscription and one-time, each display the calculated price, a save amount in dollars, and a percentage badge. The frequency dropdown lists all available selling plans with the merchant's default pre-selected.
The JavaScript Custom Element
class subscriptionWidget extends HTMLElement {
    constructor() {
        super();
        this.CURRENT_SELLING_PLAN_ID = this.getAttribute('data-current_selling_plan_id');
        this.CURRENT_PRODUCT_ID = this.getAttribute('data-current_product_id')
        this.PRODUCT_FORM = document.querySelector(`form#product_form_${this.CURRENT_PRODUCT_ID}`);
        this.querySelector('.delivery__options').addEventListener('change', this.changeSellingPlan.bind(this));
        this.querySelectorAll('.purchase-option').forEach(option => option.addEventListener('click', () => this.changePurchaseType(option)));
        this.changePurchaseType(this.querySelector('.purchase-option.selected'));
    }

    changeSellingPlan(event) {
        this.CURRENT_SELLING_PLAN_ID = event.target.value;
        const selling_plan = this.CURRENT_SELLING_PLAN_ID;
        this.PRODUCT_FORM.querySelectorAll('input[name="selling_plan"]').forEach(element => element.value = selling_plan);
    }

    changePurchaseType(element) {
        this.querySelector('.purchase-option.selected').classList.remove('selected')
        element.classList.add('selected');
        const purchase_type = element.getAttribute('data-purchase_type');
        this.PRODUCT_FORM.querySelectorAll('input[name="selling_plan"]').forEach(element => element.remove());
        if (purchase_type === 'subscription') {
            const SELLING_PLAN_ELEMENT = document.createElement('INPUT');
            SELLING_PLAN_ELEMENT.name = "selling_plan";
            SELLING_PLAN_ELEMENT.type = "hidden";
            SELLING_PLAN_ELEMENT.value = this.CURRENT_SELLING_PLAN_ID;
            this.PRODUCT_FORM.appendChild(SELLING_PLAN_ELEMENT);
        }
        const { enableDynamicPrice } = this.dataset;
        if (enableDynamicPrice == "true") {
            const priceContent = this.querySelector('.purchase-option.selected .purchase-price').innerHTML;
            document.querySelectorAll(".product__price [data-price]").forEach(element => element.innerHTML = priceContent);
        }
    }
}
customElements.define('subscription-widget', subscriptionWidget);
The class extends HTMLElement and initializes in the constructor by reading data attributes and binding event listeners. changeSellingPlan() fires when the frequency dropdown changes, it updates the internal selling plan ID and writes that value to the hidden input on the product form. changePurchaseType() handles the toggle between subscription and one-time purchase. When switching to subscription, it creates a hidden selling_plan input and appends it to the product form. When switching to one-time, it removes that input entirely, which is exactly how Shopify knows to process the line item as a regular purchase.
The dynamic price update is the final piece. When enableDynamicPrice is set to "true" via the data attribute, switching purchase types also updates the main product price displayed on the page. It grabs the innerHTML from the selected option's price element and writes it to every [data-price] element inside .product__price. Using innerHTML rather than textContent preserves any currency formatting HTML the theme uses.
Why Web Components? The custom element lifecycle is managed entirely by the browser. No initialization race conditions with theme JavaScript, no framework version conflicts, and the widget works identically in Dawn, Prestige, Impact, or any custom theme. The constructor() runs when the element is parsed, guaranteeing the DOM is ready.
Dynamic Price Display
The enableDynamicPrice feature deserves special attention because it solves a common UX problem with subscription widgets. Without it, the main product price on the page shows the one-time price even when the customer has selected "Subscribe & Save." This creates a disconnect, the widget shows the discounted price, but the product header still displays the original. Customers hesitate because the visual hierarchy suggests they're paying the higher amount.
When the feature is toggled on through the theme editor, selecting a purchase type immediately updates every price element matching .product__price [data-price]. This selector targets the standard pricing pattern used in most Shopify themes, where the product price is wrapped in a container with a data-price attribute. The swap uses innerHTML to preserve currency symbols, formatting spans, and any compare-at-price strikethrough markup the theme renders.
Theme compatibility. If your theme uses a different selector for the product price, update the querySelectorAll target in changePurchaseType(). Inspect your theme's product price markup with browser DevTools and adjust the selector accordingly.
Per-Unit Pricing Breakdown
For products sold in multi-packs, shampoo bars, protein bars, coffee pods, showing only the total price obscures the per-unit value. A customer comparing a 4-pack at $22.00 against a single bar at $7.00 has to do the math themselves. The price_per_bar setting eliminates this friction by letting merchants display "4 Bars at $5.50 per bar" directly in the subscription widget.
The Liquid template already assigns the price_per_bar setting from the block configuration. To render the per-unit breakdown, extend the template with a calculation based on the selected bar count:
{%- if price_per_bar != 'none' -%}
    {%- case price_per_bar -%}
        {%- when '1' -%}
            {%- assign bar_count = 1 -%}
        {%- when '2' -%}
            {%- assign bar_count = 2 -%}
        {%- when 'custom' -%}
            {%- assign bar_count = block_settings.custom_bar_count -%}
    {%- endcase -%}
    {%- assign per_bar_price = subscription_price | divided_by: bar_count -%}
    <p class="per-bar-price">{{ bar_count }} Bars at {{ per_bar_price | money }} per bar</p>
{%- endif -%}
This works with both subscription and one-time pricing. The per-unit calculation uses whichever price is currently displayed in the option card, so customers always see the correct per-bar cost for their selected purchase type. Transparency like this increases conversion because customers can compare per-unit value across product sizes and purchase options without mental math.
Styling the Widget
The visual design uses a two-card layout where subscription and one-time options sit side by side, each showing the price, save amount, and a percentage badge. The selected card gets a highlighted border and subtle background shift, making the active choice immediately obvious.
.purchase-option-box {
    display: block;
    margin: 1.5rem 0;
}

.options__container {
    display: flex;
    gap: 0.75rem;
}

.purchase-option {
    flex: 1;
    display: flex;
    align-items: center;
    justify-content: space-between;
    padding: 1rem 1.25rem;
    border: 2px solid #e2e2e2;
    border-radius: 12px;
    cursor: pointer;
    transition: border-color 0.2s ease, background-color 0.2s ease;
}

.purchase-option:hover {
    border-color: #8c6144;
}

.purchase-option.selected {
    border-color: #8c6144;
    background-color: rgba(140, 97, 68, 0.05);
}

.purchase-price {
    font-size: 1.25rem;
    font-weight: 600;
    color: #1a1a1a;
}

.purchase-saved-costs {
    font-size: 0.8rem;
    color: #8c6144;
    font-weight: 500;
}

.saved-percents {
    display: flex;
    flex-direction: column;
    align-items: center;
    background-color: #8c6144;
    color: #fff;
    padding: 0.35rem 0.6rem;
    border-radius: 6px;
    font-size: 0.75rem;
    font-weight: 700;
    line-height: 1.2;
}

.saved-percents.zero-saved {
    display: none;
}

.purchase-label {
    font-size: 0.85rem;
    color: #666;
    font-weight: 500;
}

.delivery-option-box {
    display: flex;
    align-items: center;
    gap: 0.75rem;
    margin-top: 1rem;
    padding: 0.75rem 1.25rem;
    background: #f5f5f5;
    border-radius: 8px;
}

.delivery-label {
    font-size: 0.85rem;
    color: #666;
    white-space: nowrap;
}

.delivery__options {
    flex: 1;
    padding: 0.5rem 0.75rem;
    border: 1px solid #ddd;
    border-radius: 6px;
    font-size: 0.85rem;
    background: #fff;
    cursor: pointer;
}

@media (max-width: 640px) {
    .options__container {
        flex-direction: column;
    }
}
The percentage badge uses a contrasting background to draw attention to the savings, and the .zero-saved class hides it entirely when there's no discount, avoiding a confusing "0% OFF" badge. The frequency dropdown sits below the cards in a muted container, visually grouped with the subscription option but not competing for attention. On mobile, the cards stack vertically with full-width layout so tap targets remain generous.
Edge Cases and Production Considerations
Variant changes. When the customer selects a different variant, selling plan allocations may change, different sizes or flavors can have different subscription prices. Listen for variant change events and update the widget's data attributes accordingly:
document.addEventListener('variant:changed', (event) => {
    const { variant } = event.detail;
    const widget = document.querySelector('subscription-widget');
    if (!widget) return;
    widget.setAttribute('data-current_variant_id', variant.id);
    widget.CURRENT_SELLING_PLAN_ID = variant.selling_plan_allocations?.[0]?.selling_plan_id;
});
Products without selling plans. If a product doesn't have any selling plan groups, the widget should be hidden entirely. Wrap the snippet render call with a conditional check in your product template:
{% if product.selling_plan_groups.size > 0 %}
    {% render 'subscription-widget',
        product: product,
        current_variant: current_variant,
        block_settings: block.settings
    %}
{% endif %}
Multiple selling plan groups. The current implementation uses .first to grab the first selling plan group, which works for stores with a single subscription type. If a product has multiple groups, say "Subscribe & Save" and "Build a Box", you'll need to either render multiple widget instances or add a group selector dropdown that switches the displayed plans.
App compatibility. The hidden input uses name="selling_plan", which is the standard Shopify convention that Recharge, Loop, Skio, and native subscriptions all expect. If your subscription app uses a non-standard input name, update the querySelectorAll selectors in both changeSellingPlan() and changePurchaseType() to match.
Key Takeaways
- Web Components are the right tool for subscription widgets, browser-native, framework-agnostic, and lifecycle-managed without external dependencies.
- Selling plan allocations pre-calculate prices, your theme doesn't need to compute discounts. Read the allocation price and display it directly.
- The hidden
selling_planinput is the integration point, adding or removing it from the product form is how Shopify knows whether a line item is a subscription. - Merchant configurability matters, section block settings let non-technical store owners control labels, defaults, frequency display, and per-unit pricing without touching code.
- Dynamic price updates reduce purchase hesitation, when the product page price matches the widget's selected option, customers trust the checkout will be correct.
- Per-unit pricing breakdowns increase conversion for multi-packs, showing "$5.50 per bar" instead of "$22.00" makes the value proposition concrete and comparable.
If your store needs a custom subscription widget that matches your brand and converts better than the default app widget, I can help you architect and build it. Let's talk about what your commerce model actually needs.